Welcome to the second part of enhancing our smart home with 433 MHz devices. We’ll delve into adding and tracking the state of these devices via your Sonoff RF BridgeR2, which you’ve already successfully integrated into Home Assistant, as discussed in our previous article. With the bridge in place, we’re poised to explore the next level of control and monitoring for your home automation setup.
Integrating the RF device into Home Assistant.
Capturing the RF commands
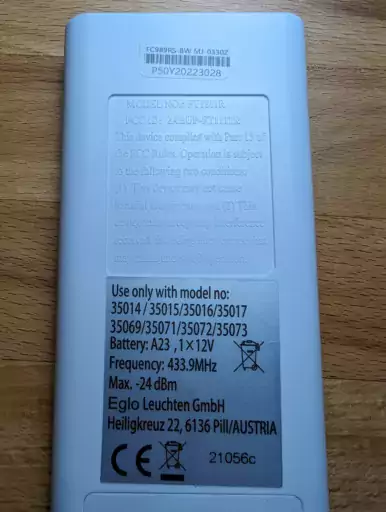
We need the device we want to add to home assistant. The main purpose why I started this whole project was to add my ceiling fan, which is one of the more complex things you can add via an RF bridge, as many states can depend on each other. First you need to get the RF source, in this case the remote:

You can see the frequency (433.9 MHz), which is the important part. Next, you need to go Home Assistant’s Events tab in the Developer Tools section. Here you can start listening to esphome.rf_code_received events.
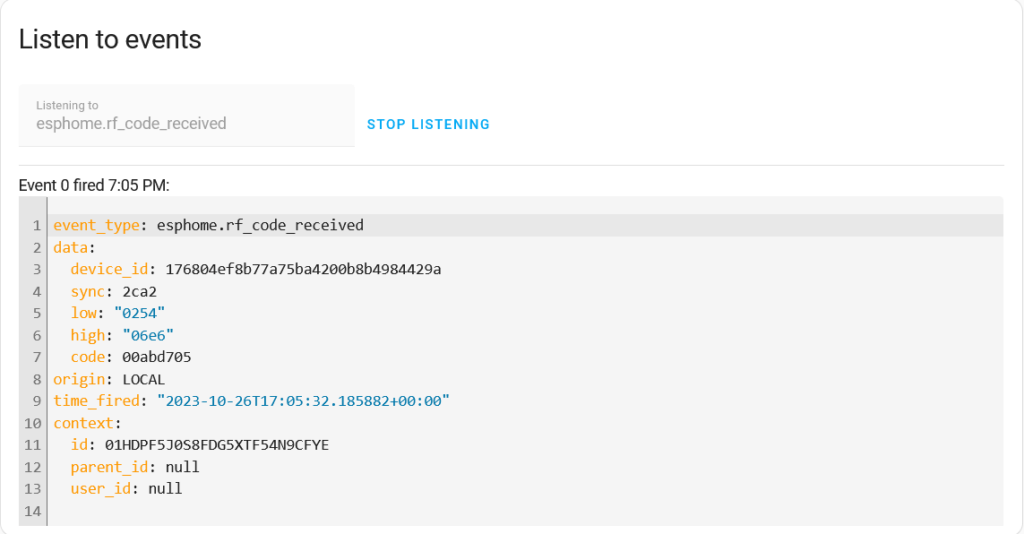
If you now press a button on the remote, you should see something like this:

Here is what the data options mean:
- sync (int): RF Sync timing
- low (int): RF Low timing
- high (int): RF high timing
- code (int): RF code
- id (ID): The ID of the RF Bridge if you have multiple components.
The essential part here is the code, which is the payload you want to reuse to control the device of your choice via Home Assistant. Go through all the options the remote control has and copy the codes and the corresponding actions.
Add helper entities
The next step may not be necessary for your case. Home Assistant is supposed to track the state of the ceiling fan, which is why we need to use some helper entities. This allows us to track state changes captured by the RF bridge and change the state of entities without automatically calling the corresponding turn_on/turn_off services. This is important because most remotes use the same RF code to turn a device on and off.

Adding Switches
To control a simple binary entity like a light, the easiest way to do so is by using a custom switch template. For me, it looks something like this:
- platform: template
  switches:
    deckenventilator_licht:
      friendly_name: "Deckenventilator Licht"
      value_template: "{{ is_state('input_boolean.deckenventilator_licht', 'on') }}"
      turn_on:
        - service: esphome.rf_bridge_send_rf_code
          data:
            sync: 11514
            low: 590
            high: 1772
            code: 11261709
        - service: input_boolean.turn_on
          target:
            entity_id: input_boolean.deckenventilator_licht
      turn_off:
        - service: esphome.rf_bridge_send_rf_code
          data:
            sync: 11514
            low: 590
            high: 1772
            code: 11261709
        - service: input_boolean.turn_off
          target:
            entity_id: input_boolean.deckenventilator_licht
The value template actually tracks the state of the helper input_boolean entity. This allows us to change the state of the entity without actually calling the turn_on/turn_off functions. Then we simply add a service call to the turn_on/turn_off functions, which send the code we captured earlier. In case of the ceiling fan lamp, it is a binary switch, so it sends the same command each time.
After the switch entity is created, it exists now in Home Assistant and can already control our light. Neat! You can now add a helper which changes the device type of the switch from switch to light to complete the integration.
Now we have a minor problem though – if we use the remote control outside of Home Assistant, it is unaware of this change and does not change the state of the entity. This can be solved by using an automation:
alias: Deckenventilator RF Bridge
description: ""
trigger:
  - platform: event
    event_type: esphome.rf_code_received
    event_data:
      code: 00abd70d
    id: licht_toggle
We can use the rf_code_received event again to listen for RF commands sent by our remote! This way, we can change the state of our entity appropriately:
action:
  - choose:
      - conditions:
          - condition: trigger
            id:
              - licht_toggle
        sequence:
          - service: light.toggle
            data: {}
            target:
              entity_id: light.deckenventilator_licht
So whenever you want to track the state of an entity that is changed outside of Home Assistant, I recommend using helper entities and using an automation to change the state accordingly.
This completes the integration of a 433 MHz light entity. The process is the same for any other binary entity you wish to add.
Integrating more complex devices
I wanted to integrate my ceiling fan, however, which is a little more complicated. It has 5 different speeds, it can reverse direction, turn its light on/off and turn the fan on/off. Luckily, Home Assistant has a Template Fan integration. It allows us to create a custom entity which offers more features than just the binary on/off if we added the fan as a simple switch.
Once again, we make use of an input_boolean helper entity to allow us to change the state of the entity without calling the send_rf_code service:
- platform: template
  fans:
    deckenventilator:
      friendly_name: "Deckenventilator"
      unique_id: deckenventilator_schlafzimmer
      value_template: "{{ is_state('input_boolean.deckenventilator', 'on') }}"
This should look mostly familiar. This simply adds a fan that you can turn on and off, which mimics the way we integrated the light before. The value_template is once again used to set the entities’ state to that of the helper function.
      direction_template: >
        {% if is_state('input_select.deckenventilator_richtung', 'Vorwärts') %}
          forward
        {% else %}
          reverse
        {% endif %}
The direction template sets the direction of the fan displayed on the UI. We use another helper entity for that.
      set_direction:
        - service: esphome.rf_bridge_send_rf_code
          data:
            sync: 0x2c90
            low: 0x024a
            high: 0x06ee
            code: 0x00abd70c
        - service: input_select.select_next
          data:
            cycle: true
          target:
            entity_id: input_select.deckenventilator_richtung
To be able to change the fan’s direction, we simply send the appropriate RF command and change the state of our helper entity.
      turn_on:
        - service: esphome.rf_bridge_send_rf_code
          data:
            sync: 0x2c8e
            low: 0x024e
            high: 0x06ea
            code: 0x00abd703
        - service: input_boolean.turn_on
          target:
            entity_id: input_boolean.deckenventilator
      turn_off:
        - service: esphome.rf_bridge_send_rf_code
          data:
            sync: 0x2c8e
            low: 0x024e
            high: 0x06ea
            code: 0x00abd703
        - service: input_boolean.turn_off
          target:
            entity_id: input_boolean.deckenventilator
Turning the fan off and on is identical to that of other boolean entities.
      percentage_template: >
        {{ states('input_number.deckenventilator_geschwindigkeit') if is_state('input_boolean.deckenventilator', 'on') else 0 }}
      speed_count: 5
The percentage_template merely controls how the speed is displayed in percent in the UI. The state of the fan is off when the speed is 0, on otherwise.
      set_percentage:
        - if:
            - condition: template
              value_template: "{{ percentage > 0}}"
          then:
            - service: input_number.set_value
              target:
                entity_id: input_number.deckenventilator_geschwindigkeit
              data:
                value: "{{ percentage }}"
            - choose:
                - conditions:
                    - condition: state
                      entity_id: input_number.deckenventilator_geschwindigkeit
                      state: "20.0"
                  sequence:
                    - service: esphome.rf_bridge_send_rf_code
                      data:
                        sync: 11514
                        low: 590
                        high: 1772
                        code: 11261701
                - conditions:
                    - condition: state
                      entity_id: input_number.deckenventilator_geschwindigkeit
                      state: "40.0"
                  sequence:
                    - service: esphome.rf_bridge_send_rf_code
                      data:
                        sync: 11514
                        low: 590
                        high: 1772
                        code: 11261706
                - conditions:
                    - condition: state
                      entity_id: input_number.deckenventilator_geschwindigkeit
                      state: "60.0"
                  sequence:
                    - service: esphome.rf_bridge_send_rf_code
                      data:
                        sync: 11514
                        low: 590
                        high: 1772
                        code: 11261702
                - conditions:
                    - condition: state
                      entity_id: input_number.deckenventilator_geschwindigkeit
                      state: "80.0"
                  sequence:
                    - service: esphome.rf_bridge_send_rf_code
                      data:
                        sync: 11514
                        low: 590
                        high: 1772
                        code: 11261705
                - conditions:
                    - condition: state
                      entity_id: input_number.deckenventilator_geschwindigkeit
                      state: "100.0"
                  sequence:
                    - service: esphome.rf_bridge_send_rf_code
                      data:
                        sync: 11514
                        low: 590
                        high: 1772
                        code: 11261698
            - service: input_boolean.turn_on
              data: {}
              target:
                entity_id: input_boolean.deckenventilator
          else:
            - service: fan.turn_off
              data: {}
              target:
                entity_id: fan.deckenventilator
Setting the actual speed is slightly more of a chore. If the given percentage is 0, we call the fan’s turn_off function, which changes the appropriate helper entity as well. If it’s not 0, it sends the appropriate command and ensures that the state of the fan is on.
In a separate automation, we make sure that we also track the commands of the RF remote:
alias: Deckenventilator RF Bridge
description: ""
trigger:
  - platform: event
    event_type: esphome.rf_code_received
    event_data:
      code: 00abd70d
    id: licht_toggle
    alias: Licht an/aus
  - platform: event
    event_type: esphome.rf_code_received
    event_data:
      code: 00abd703
    id: fan_toggle
    alias: Ventilator an/aus
  - alias: Wintermodus
    platform: event
    event_type: esphome.rf_code_received
    event_data:
      code: 00abd70c
    id: modus_remote
condition: []
action:
  - choose:
      - conditions:
          - condition: trigger
            id:
              - licht_toggle
        sequence:
          - service: homeassistant.toggle
            data: {}
            target:
              entity_id: input_boolean.deckenventilator_licht
      - conditions:
          - condition: trigger
            id:
              - fan_toggle
        sequence:
          - service: homeassistant.toggle
            data: {}
            target:
              entity_id: input_boolean.deckenventilator
      - conditions:
          - condition: trigger
            id:
              - modus_remote
        sequence:
          - service: homeassistant.toggle
            data: {}
            target:
              entity_id: input_boolean.deckenventilator_wintermodus
          - service: input_boolean.turn_on
            data: {}
            target:
              entity_id: input_boolean.deckenventilator
mode: single
And… That’s it! You should now have a fully integrated fan.
Troubleshooting and Tips
It is possible and possibly quite probably that the state of the entities in Home Assistant and the devices controlled via RF commands will diverge occasionally. This can, for instance, happen, when calling commands too quickly one after another: Only one of the commands will actually arrive at the device, but both commands will change the entity in home assistant. So if you quickly enable and disable the fan, it can be turned on while the entity’s state is turned off.
I don’t have a workaround for this right now as we have no real way of tracking the actual state of the devices, so it is just something to keep in mind.
Conclusion
It is actually quite cheap and easy to add 433MHz controlled devices to Home Assistant. The largest time investment was actually figuring out how to create the custom fan template and make sure the states work as they should, which is why I’ve created this article — I hope it saves you some time! If it helped you, and you need one of the components mentioned above, I’d appreciate the purchase via one of the affiliate links — or buy me a coffee if we ever meet!


Thanks for the article! Thanks to you I successfully flashed ESPHome to my RFbridge and added it to Home Assistant. However, I don’t receive any RF events (like described above). I have cross-checked my remotes and they indeed are 433,92 MHz, so I suppose at least in theory they should work.
Any ideas why it doesn’t work for me?
Unfortunately, I’ve encountered similar problems when trying to add my parent’s ceiling fan to home assistant. Despite being from the same manufacturer, they appear to be using a different encoding that the sonoff bridge is unable to pick up. I ended giving up, sadly. The older versions of the RF Bridge could be flashed with some additional custom firmware that would allow you to extend the protocols it can decipher. I only have the Gen2, and it’s not certain that would have helped anyway.
Overall, it seems like adding RF devices is a crapshoot; it’s a wild west of home-brewed protocols and whether you can decipher the used encoding is entirely based on luck. Your next best bet would be replacing the fan driver with a smart one. Sonoff has one of those https://sonoff.tech/product/diy-smart-switches/ifan04-l/
I am not sure why some information was missed in the original write up. The rf-ridge component required a different rf chip that is only avaialble on the older version of the sonoff bridge. Following this guide will not get you to receive any signals.
You can hard mod the device to make it work. A custom firmware and guide is also being developed.
You can see the discussion here:
https://github.com/arendst/Tasmota/discussions/13283
https://community.home-assistant.io/t/new-sonoff-rf-bridge-board-need-flashing-help/
You definitely can send and receive signals with this version. Yes, it lacks the extra chip with the Portisch firmware — so it is less versatile. But that’s not the point of the write-up. The point is to show how you can get something done with the R2, since it’s currently the only one available.